The retina of our eye is a surface of photosensitive cells (receptors) distributed more or less like photoactive elements in a digital camera, so it gathers only a 2d-image. We see the depth only because we use two eyes and both eyes see objects from a different angle. These different points of view are transformed in our brain into a three-dimensional image. So, it is possible to see a 3d image on a flat monitor screen when two images, made form 2 different points (left and right camera) are presented. The trick is that the image made from the right camera must be seen only by a right eye, and the left eye must look only at the photo made by the left camera. There are several devices that make this task easy, but if you are new to this, it is likely that you don't have any of this equipment and must rely on free viewing. Fortunately, free viewing of 3d images is possible, but unfortunately it is not natural process and requires some practice.
There are two double image presentation methods for free viewing. The first one is called parallel, where the left-eye picture is placed on the left and the right-eye picture is on the right. The second is called the cross-eyes method, when the pictures are reversed as shown below.
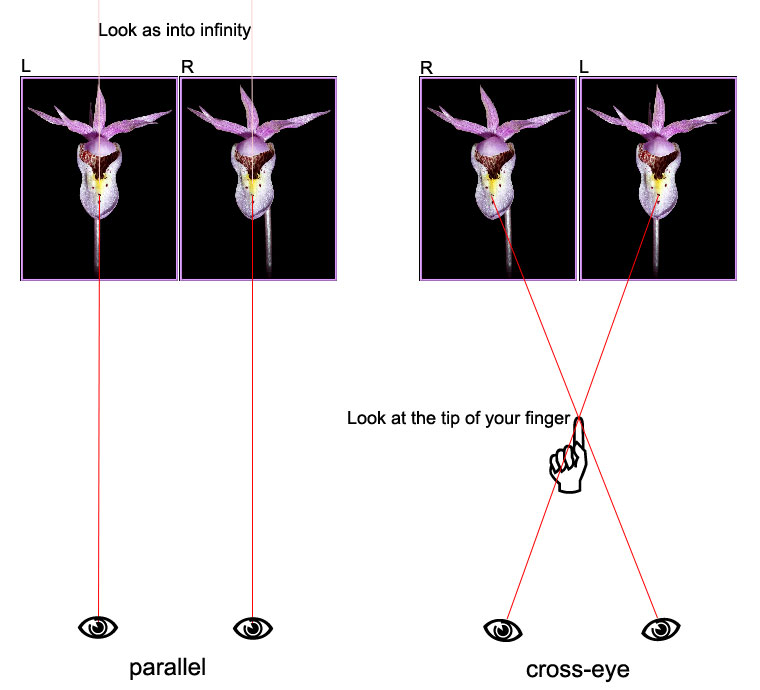
The parallel format has been used in the past almost exclusively, and it is still a standard for 3d image presentation in printed publications. It is more natural an you see more depth than with the cross-eyes format. The cross-eyes is the preferred by most of people format in this computer age because it is easier to learn and allows seeing large photos. In this format the left image is on the right, so that only when you cross your eyes, you see the left image with the left eye and the right image with the right eye. Please analyze the right part of the diagram shown above.
To view the pictures in parallel format "defocus" your eyes as you'd be looking at a very distant object, like seeing through (analyze the left part of the diagram). After some time you will begin to see three images. The one in the center will be three-dimensional. If you practice this on the diagram above please cover the right part of it that deals with the cross-eye method. It is relatively easy to see small photo pairs, smaller than the distance between your eyes. For viewing larger photos in parallel format I recommend using a stereo viewer, which can be purchased from several vendors (search Google for 'stereo viewers'; but don't buy a cheap stuff: in my opinion, a Pokescope is the lowest acceptable grade viewer, for about $40). Another method to learn parallel 3D vision provides the Magic Eye site.
Cross-eye viewing technique: choose a distinctive, contrasty object on the pair of photos, and place your finger between them, closer to the screen. A good page to practice is 'Moon in 3D' (not this diagram because it's too small). Now, slowly keep bringing your finger to your eyes and watch the two images of the object slowly closing to each other and making a third image. Important: keep focus on your finger all the time. When the objects merge together and form a stable third image you may remove the finger and focus on the middle object. Now you should see the entire photo in 3D. The further you are from the screen the easier is to learn the technique.
Another cross-eye viewing learning technique involves looking at the cross-eye pair through a slit or narrow opening made with palms of your hands. Cover left picture with your left hand and right picture with your right hand. Check this with only one eye opened. Than, open both eyes and you should instantly see a 3d picture.
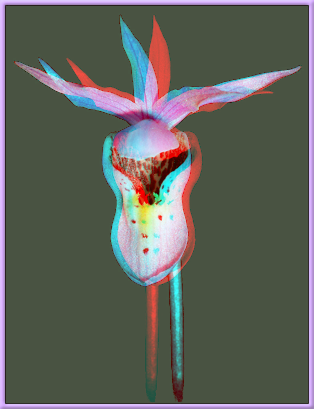
A great tool to learn parallel and cross eyes technique involves anaglyph glasses. You need to look at the anaglyph and than click on the button that would start diverging the images. When it's done and you still see a 3d image, you may take out your glasses without loosing the 3d effect.
There are other 3d viewing methods that require additional equipment or elaborate set-ups (mirror viewing, shutter glasses, slide projections) that are not discussed here. One very popular method of 3d presentation through anaglyphs, that only requires red/blue or red/cyan cardboard glasses (I can mail you one if you send me a $1 bill plus a USPS standard letter mail stamp with a return address, and if that's too expensive - you may find them cheaper on the web). I use AnaBuilder software to make my anaglyphs. Many people don't like this method because it often produces ghosting and shows unnatural colors. This is true that red/cyan glasses are red color-unfriendly, but lots of ghosting issues can be solved by adjusting gamma of your monitor.
